

We are hoping and praying that Dan is able to get on a plane tomorrow morning. That all hinges on whether or not they are able to complete the third and final plane in the order today. It is scheduled to be completed today, however, the other two planes both were completed the day after they were scheduled due to various issues.
If it doesn't get completed today then instead of taking the early flight out tomorrow morning and being home by tomorrow evening, Dan would have to stay on Friday and then take the red-eye home on Friday night arriving Saturday. Needless to say, the kids and I are praying for a miracle that this final plane is able to be completed today so that Dan can get home!
Today I thought I would share with you this new recipe I tried this week. Typically when Dan is gone, I don't cook. However, when your husband is gone for a month, you don't just tell the kids to eat whatever they want for a month. So the other night I picked up a rotisserie chicken -technically that's not cooking but both kids love those. But I did make a new potato dish. It's called melting potatoes and I saw it somewhere online.
They were billed as "crispy on the outside and melt in your mouth on the inside" which is exactly how I would describe the Pioneer Woman's Crashed Hot Potatoes which I make frequently and everyone loves. The main difference being that this recipe looked a little less time consuming. So I gave it a shot.
And they were good! Really good! I will be making these again for Dan whenever he gets home!
The recipe can be found here on ClosetCooking.com.
If you decided to try these - please note that the recipe calls for the potatoes to be sliced to an inch thick. If you look at the pictures posted with the original recipe, it is clear that the potatoes were sliced a half inch not an inch. And that's what I did and they came out perfectly. I think sometimes people say an inch without realizing exactly how big an inch really is.
And mine really could have used a few extra minutes in the oven but they were still really good!
I hope you give these a try and let me know what you think!
Showing posts with label Recipes. Show all posts
Thursday, December 22, 2016
Thursday, October 20, 2016
Winner Winner Chicken Dinner!
Last night for dinner, I tried a new recipe. It was Creamy Tuscan Garlic Chicken from the Recipe Critic.
And it was quite yummy. The sauce was rich and fattening but I decided that the spinach and sun-dried tomatoes off set the heavy cream. It was like getting a double dose of vegetables, right?
It was easy and delicious and I served it with rice and green beans but it would be really good over an angel hair pasta. Sarah and were drinking the sauce by the spoonful after dinner. Which is okay for her since she swims and has the metabolism of a 12-year-old. Me, not so much. I'll have to do a few extra laps up and down the steps today to get some of that sauce off before it decides to call my hips and thighs home.
Here's the recipe below but definitely click over to her blog. She has beautiful pictures of the dish and a nice printable recipe!
And it was quite yummy. The sauce was rich and fattening but I decided that the spinach and sun-dried tomatoes off set the heavy cream. It was like getting a double dose of vegetables, right?
It was easy and delicious and I served it with rice and green beans but it would be really good over an angel hair pasta. Sarah and were drinking the sauce by the spoonful after dinner. Which is okay for her since she swims and has the metabolism of a 12-year-old. Me, not so much. I'll have to do a few extra laps up and down the steps today to get some of that sauce off before it decides to call my hips and thighs home.
Here's the recipe below but definitely click over to her blog. She has beautiful pictures of the dish and a nice printable recipe!
Author: Alyssa at The Recipe Critic
Serves: 4-6
Ingredients
- 1½ pounds boneless skinless chicken breasts, thinly sliced
- 2 Tablespoons olive oil
- 1 cup heavy cream
- ½ cup chicken broth
- 1 teaspoon garlic powder
- 1 teaspoon Italian seasoning
- ½ cup Parmesan cheese
- 1 cup spinach, chopped
- ½ cup sun dried tomatoes
Instructions
- In a large skillet add olive oil and cook the chicken on medium high heat for 3-5 minutes on each side or until brown on each side and cooked until no longer pink in center. Remove chicken and set aside on a plate.
- Add the heavy cream, chicken broth, garlic powder, italian seasoning, and parmesan cheese. Whisk over medium high heat until it starts to thicken. Add the spinach and sundried tomatoes and let it simmer until the spinach starts to wilt. Add the chicken back to the pan and serve over pasta if desired.
Notes
*If you are serving over pasta and like it saucy, definitely double the sauce.
Monday, August 29, 2016
Cousin Shirley's Sweet and Spicy Salsa
I made salsa on Friday and it turned out really great! It was sweet and spicy and really yummy!
Here are all the ingredients in the pot. Isn't it pretty?
And might I add that the tomatoes, green pepper and jalapenos were all from our garden! I did have to buy the onions because that's something that we've never grown.
Here it is simmering in the pot.
And here's the finished product!
And here's the recipe!
Here are all the ingredients in the pot. Isn't it pretty?
And might I add that the tomatoes, green pepper and jalapenos were all from our garden! I did have to buy the onions because that's something that we've never grown.
Here it is simmering in the pot.
And here's the finished product!
And here's the recipe!
Cousin Shirley's Sweet and Spicy Salsa
1 gallon tomatoes peeled and quartered
1 1/2 cups sugar (you can adjust the sugar according to taste.)
3 T. salt
2 cups chopped onion
2 cups chopped bell pepper
1 cup white vinegar
1 7oz jar jalapeƱo peppers, drained (I used fresh and wish that I had left in more of the ribs and seeds because I wanted a little more spice. However, other family members thought it was perfect the way it was. You will need to adjust accordingly.)
Bring to a slow boil. Lower heat and simmer until thick (I simmered mine for 1 hour but Shirley simmers hers for 2. I like my salsa a little chunky that's why I simmered for less time.)
uncovered
Heat clean jars, add salsa, and seal.
For me, this filled 5 quart sized Mason jars.
Friday, July 15, 2016
Your crock pot is your friend!
Our swim team has practice in the mornings and in the evenings. You don't have to go to both but we always do. The swim season is very short, the pool is just a few minutes from our house, I get to talk to my BFF at evening practice and the kids get to see their friends again. So twice a day practice it is!
Evening practice for 11-year-olds and up is from 6:45 to 7:30. Dan usually gets home from work right as we are pulling out so in order to eat dinner as a family before 8:00 PM, I have been using my crock pot like crazy this summer. As much as my family loves beef stew (and they really do!), I have been trying to find different things to put in the crock pot and last night was a winner! Everyone liked it (that's rare) and I will be making it again.
We had Philly Cheese Steak Sandwiches! The filling cooked all day in the crock pot. When I got home from swim practice, I put some hoagie rolls under the broiler to get them toasty. Then I added provolone cheese to each roll and let that get melty and then we heaped the filling on to the sandwiches. It was so good! And so easy!
The original recipe is from Food.com and can be found here. I omitted the mushrooms because no one in our family eats them but you can add them if you like.
Here's what I did:
Ingredients:
Cube steak - I used about 1 and 1/2 pounds - slice it thin
Peppers - I had red and orange and yellow so that's what I used instead of green
Onion - slice it really thin
1 t. salt
1 t. pepper
1/2 bag of pepperoni
Directions:
Dump all of the above into a crock pot. Cook on low for 6 hours.
Toast hoagie rolls under broiler. Add provolone cheese until a little melty. Add the mixture from the crock pot onto hoagie rolls and enjoy!
YUM!
This is the mixture before we loaded it onto our sandwiches.
And Sarah baked chocolate chip cookies we which had for dessert. (Well, technically, I had been eating them all afternoon but I also had one after dinner!)
Enjoy your weekend!
Evening practice for 11-year-olds and up is from 6:45 to 7:30. Dan usually gets home from work right as we are pulling out so in order to eat dinner as a family before 8:00 PM, I have been using my crock pot like crazy this summer. As much as my family loves beef stew (and they really do!), I have been trying to find different things to put in the crock pot and last night was a winner! Everyone liked it (that's rare) and I will be making it again.
We had Philly Cheese Steak Sandwiches! The filling cooked all day in the crock pot. When I got home from swim practice, I put some hoagie rolls under the broiler to get them toasty. Then I added provolone cheese to each roll and let that get melty and then we heaped the filling on to the sandwiches. It was so good! And so easy!
The original recipe is from Food.com and can be found here. I omitted the mushrooms because no one in our family eats them but you can add them if you like.
Here's what I did:
Ingredients:
Cube steak - I used about 1 and 1/2 pounds - slice it thin
Peppers - I had red and orange and yellow so that's what I used instead of green
Onion - slice it really thin
1 t. salt
1 t. pepper
1/2 bag of pepperoni
Directions:
Dump all of the above into a crock pot. Cook on low for 6 hours.
Toast hoagie rolls under broiler. Add provolone cheese until a little melty. Add the mixture from the crock pot onto hoagie rolls and enjoy!
YUM!
This is the mixture before we loaded it onto our sandwiches.
And Sarah baked chocolate chip cookies we which had for dessert. (Well, technically, I had been eating them all afternoon but I also had one after dinner!)
Enjoy your weekend!
Thursday, March 10, 2016
A quick and easy meal that acutally tasted good!
Peter's been bugging me to make salmon. He thinks he likes fish. He actually really wants to like fish because his Uncle Bob loved fish. However, the only fish he can eat and sort of enjoy is salmon.
Dan, who hates fish, (the taste, the texture, the smell, all of it - except he will occasionally tuna salad for lunch during Lent) is out of town so Peter suggested this would be a perfect time to have salmon.
Since Sarah has never had it, I thought what the heck. I like salmon but have never had a chance to prepare it since Dan doesn't eat it and figured this would be my chance to give it a whirl.
I searched for a recipe and kept coming finding the brown sugar and butter versions and while I know those would be yummy, I am dieting and would prefer a more healthy option.
I found a very easy recipe for Baked Salmon with Parmesan Herb Crust over at Add A Pinch. And y'all! It did not disappoint. It was quick and easy to make and the kids enjoyed it. (Well, Peter more than Sarah but she ate a lot of it considering it was her first try.) I didn't have any fresh parsley so I used dried and it worked fine. Other than that, I followed her instructions to a tee and it came out great.
I wanted roasted broccoli to go with it and found this great recipe at The Cookie Rookie for Roasted Lemon Parmesan Broccoli. This broccoli was yummy and also had Parmesan cheese so it paired nicely with the salmon. And the best part? The broccoli cooks at the same temp as the salmon so I was able to cook both at the same time!
I had some crusty bread for the kids but since I'm trying to lose a few pounds, I skipped the bread and added a salad with feta and Greek dressing. Yes, I know it's a very cheesy meal but don't worry - it's all on my healthy eating plan so I could enjoy it without guilt!
If you're looking for a new salmon recipe, I would definitely give this one a try!
Dan, who hates fish, (the taste, the texture, the smell, all of it - except he will occasionally tuna salad for lunch during Lent) is out of town so Peter suggested this would be a perfect time to have salmon.
Since Sarah has never had it, I thought what the heck. I like salmon but have never had a chance to prepare it since Dan doesn't eat it and figured this would be my chance to give it a whirl.
I searched for a recipe and kept coming finding the brown sugar and butter versions and while I know those would be yummy, I am dieting and would prefer a more healthy option.
I found a very easy recipe for Baked Salmon with Parmesan Herb Crust over at Add A Pinch. And y'all! It did not disappoint. It was quick and easy to make and the kids enjoyed it. (Well, Peter more than Sarah but she ate a lot of it considering it was her first try.) I didn't have any fresh parsley so I used dried and it worked fine. Other than that, I followed her instructions to a tee and it came out great.
I wanted roasted broccoli to go with it and found this great recipe at The Cookie Rookie for Roasted Lemon Parmesan Broccoli. This broccoli was yummy and also had Parmesan cheese so it paired nicely with the salmon. And the best part? The broccoli cooks at the same temp as the salmon so I was able to cook both at the same time!
I had some crusty bread for the kids but since I'm trying to lose a few pounds, I skipped the bread and added a salad with feta and Greek dressing. Yes, I know it's a very cheesy meal but don't worry - it's all on my healthy eating plan so I could enjoy it without guilt!
If you're looking for a new salmon recipe, I would definitely give this one a try!
Wednesday, February 17, 2016
Crock Pot Italian Chicken and Vegetables
I thought I would share one of my favorite go-to crock pot meals.
Crock Pot Italian Chicken and Vegetables
Ingredients:
4 boneless chicken breasts
1 cup Italian salad dressing (usually I just add in the whole small bottle, I like it saucy)
2 teaspoons of Italian seasoning
potatoes, peeled and cut into chunks (as you can see, I didn't even bother peeling)
carrots, peeled and cut into chunks (as you can see, baby carrots work great too)
Fresh grated Parmesan cheese (NOT the kind in the green can)
Directions:
Place chicken in crock pot. Sprinkle with half the Italian dressing, and Italian seasoning. Place carrots and potatoes around the chicken and cover with remaining dressing and Italian seasoning. Cook on low for about 6 hours or until chicken is done and veggies are tender.
I always like to sprinkle a little Parmesan over the dish before serving.
Enjoy!
Crock Pot Italian Chicken and Vegetables
Ingredients:
4 boneless chicken breasts
1 cup Italian salad dressing (usually I just add in the whole small bottle, I like it saucy)
2 teaspoons of Italian seasoning
potatoes, peeled and cut into chunks (as you can see, I didn't even bother peeling)
carrots, peeled and cut into chunks (as you can see, baby carrots work great too)
Fresh grated Parmesan cheese (NOT the kind in the green can)
Directions:
Place chicken in crock pot. Sprinkle with half the Italian dressing, and Italian seasoning. Place carrots and potatoes around the chicken and cover with remaining dressing and Italian seasoning. Cook on low for about 6 hours or until chicken is done and veggies are tender.
I always like to sprinkle a little Parmesan over the dish before serving.
Enjoy!
Tuesday, February 9, 2016
Garlic Jalapeno Whipped Feta Dip!
I tried a new recipe for our little Super Bowl party and I wanted to share it with you. I typically make my jalapeno popper dip but felt like shaking it up a bit. (And I would like to point out that I posted the popper recipe in 2008, long before everyone and their brother was making it. I like to think I was a bit of a trendsetter back in the day.)
My new find is Garlic Jalapeno Whipped Feta dip. Apparently I have a minor obsession with jalapenos (featured prominently here, here and here). A girl's got to do something with all those jalapenos her husband grows!
I found the recipe at Carlsbad Craving and it is definitely worth a try.
Thanks to the red wine vinegar and the honey, the dip starts out sweet. In the middle there's a nice punch of salt thanks to the feta and it finishes with a spicy kick thanks to the jalapenos. (I think I watch a little too much Food Network!)
This dip was good with pretzel things, pita chips and vegetables. And it's so pretty.
It even complimented my guac and salsa arrangement:
Enjoy!
My new find is Garlic Jalapeno Whipped Feta dip. Apparently I have a minor obsession with jalapenos (featured prominently here, here and here). A girl's got to do something with all those jalapenos her husband grows!
I found the recipe at Carlsbad Craving and it is definitely worth a try.
Thanks to the red wine vinegar and the honey, the dip starts out sweet. In the middle there's a nice punch of salt thanks to the feta and it finishes with a spicy kick thanks to the jalapenos. (I think I watch a little too much Food Network!)
This dip was good with pretzel things, pita chips and vegetables. And it's so pretty.
It even complimented my guac and salsa arrangement:
Enjoy!
Wednesday, December 9, 2015
Jalapeno Popper Grilled Cheese Panini
Every Sunday my mom makes a big lunch and we head next door after Mass to enjoy it. Cooking food for others is my mom's love language and eating food prepared by others is mine. So it works out great!
The only problem is that I'm usually so full from lunch that I don't ever want to fix anything for dinner. Which is fine with me, but not my little family. So I'm always trying to figure out what to cook that is tasty, easy, and light. (And by light, I mean, not much food, not light in calories.)
A couple of months ago I purchased a sandwich press thinking that we could just make paninis for Sunday supper.
I've made cubans (which Dan and I love) and lots of grilled cheese with bacon which has also been a big hit.
But I've been wanting to branch out. So when I stumbled on a recipe for Jalapeno Popper Grilled Cheese, I knew I would have to give it a try!
And that's exactly what I did this past Sunday. I didn't have the apricot preserves so I subbed peach jam and I always use Ciabatta rolls that I get from Aldi's. And oh my! These were delicious.
After Dan finished his, I asked if he would eat this again and he shook his head yes as he was licking his lips. (That was almost as good as two thumbs up from him.)
So, this is what we'll be having again this Sunday. The kids will be sticking to their grilled cheese and bacon but that's okay with me. More jalapenos and goat cheese for me!
Please check out the original recipe because she actually roasted her own peppers (and her picture is way prettier than mine). There's no way I'm ever going to roast peppers so here's my lazy Sunday evening version:
Jalapeno Popper Grilled Cheese Panini
Ingredients:
2 slices ciabatta bread
2 ounces goat cheese, softened
2 slices bacon, cooked
1 - 2 tablespoons jalapenos, pickles and chopped
1 tablespoon peach preserves (or apricot or any mildly sweet preserves)
1 tablespoon butter, melted
Directions:
Spread one slice of bread with goat cheese. Top with jalapenos and then bacon.
Spread the other piece of bread with preserves and place on top of the other piece.
Spread tops of bread with melted butter.
Place into sandwich press and cook.
Enjoy!
The only problem is that I'm usually so full from lunch that I don't ever want to fix anything for dinner. Which is fine with me, but not my little family. So I'm always trying to figure out what to cook that is tasty, easy, and light. (And by light, I mean, not much food, not light in calories.)
A couple of months ago I purchased a sandwich press thinking that we could just make paninis for Sunday supper.
I've made cubans (which Dan and I love) and lots of grilled cheese with bacon which has also been a big hit.
But I've been wanting to branch out. So when I stumbled on a recipe for Jalapeno Popper Grilled Cheese, I knew I would have to give it a try!
And that's exactly what I did this past Sunday. I didn't have the apricot preserves so I subbed peach jam and I always use Ciabatta rolls that I get from Aldi's. And oh my! These were delicious.
After Dan finished his, I asked if he would eat this again and he shook his head yes as he was licking his lips. (That was almost as good as two thumbs up from him.)
So, this is what we'll be having again this Sunday. The kids will be sticking to their grilled cheese and bacon but that's okay with me. More jalapenos and goat cheese for me!
Please check out the original recipe because she actually roasted her own peppers (and her picture is way prettier than mine). There's no way I'm ever going to roast peppers so here's my lazy Sunday evening version:
Jalapeno Popper Grilled Cheese Panini
Ingredients:
2 slices ciabatta bread
2 ounces goat cheese, softened
2 slices bacon, cooked
1 - 2 tablespoons jalapenos, pickles and chopped
1 tablespoon peach preserves (or apricot or any mildly sweet preserves)
1 tablespoon butter, melted
Directions:
Spread one slice of bread with goat cheese. Top with jalapenos and then bacon.
Spread the other piece of bread with preserves and place on top of the other piece.
Spread tops of bread with melted butter.
Place into sandwich press and cook.
Enjoy!
Thursday, November 12, 2015
Souper Soup Recipe!
I love a good homemade soup. And Dan loves meat, potatoes and bread. So when I found this recipe on Pinterest, I knew I had to try it.
It was good. Very good. Dan raved about it. He had leftovers the next day and continued to rave about it.
Dan never raves about anything I make.
I am taking dinner to a friend in a few weeks and I think this is the recipe I'm going with. However, I'm going to make it one more time just to make sure I don't screw it up. And also, the biscuits were only so so. I might use another biscuit recipe. This one had good flavor but they were a little dry. Perhaps I over worked the dough or over baked them. Not sure so I guess I need to try them again before I completely rule them out.
Anyway, here's a really yummy soup recipe! Enjoy! (Both recipes found on CookingClassy)
It was good. Very good. Dan raved about it. He had leftovers the next day and continued to rave about it.
Dan never raves about anything I make.
I am taking dinner to a friend in a few weeks and I think this is the recipe I'm going with. However, I'm going to make it one more time just to make sure I don't screw it up. And also, the biscuits were only so so. I might use another biscuit recipe. This one had good flavor but they were a little dry. Perhaps I over worked the dough or over baked them. Not sure so I guess I need to try them again before I completely rule them out.
Anyway, here's a really yummy soup recipe! Enjoy! (Both recipes found on CookingClassy)
Creamy Chicken Pot Pie Soup with Parmesan Drop Biscuits
Prep Time: 30 minutes
Cook Time: 30 minutes
Yield: About 4 - 6 servings
Ingredients
- 20 oz. boneless skinless chicken breast, cooked and shredded in to bite size pieces
- 5 1/2 Tbsp butter
- 1 cup chopped yellow onion (1 small onion)
- 1 cup diced celery (about 3 stalks)
- 1 cup peeled and diced carrots (about 2 carrots)
- 1 (15 oz) can low-sodium chicken broth
- 2 cups (heaping) peeled and 1/2-inch diced russet potatoes (2 medium potatoes)
- 1/2 tsp dried parsley
- 1/4 tsp dried thyme
- 1/4 tsp dried crushed rosemary
- 1 bay leaf
- Salt and freshly ground black pepper
- 1 cup frozen or fresh peas
- 2 1/2 cups milk
- 6 Tbsp all-purpose flour
- 1/2 cup heavy cream
- 1 1/2 tsp lemon juice
- 1 recipe Parmesan drop biscuits, recipe follows
Directions
- In an enameled cast iron pot, melt 1 1/2 Tbsp butter over medium-high heat. Add in onion, carrot and celery and saute 3 minutes. Add chicken broth, potatoes, parsley, thyme, rosemary, bay leaf and season with salt and pepper to taste. Bring soup to a boil, then reduce heat to medium, (press veggies down into broth) cover with lid, and allow to cook, stirring occasionally, until potatoes are tender, about 15 - 25 minutes. Reduce heat to low and stir in chicken and peas.
- In a medium saucepan set over medium heat, melt remaining 4 Tbsp butter. Stir in flour and cook mixture, stirring constantly for 1 1/2 minutes. While whisking slowly pour in milk and whisk vigorously to smooth lumps. Season with salt and pepper to taste. Bring mixture to a boil over medium high heat while stirring constantly, then remove from heat and stir in cream. Pour and stir milk mixture into mixture in pot. Stir in lemon juice.
- Remove bay leaf and serve warm with Parmesan Drop Biscuits.
Parmesan Drop Biscuits
Prep Time: 5 minutes
Cook Time: 10 minutes
Yield: About 10 biscuits
Ingredients
- 1 1/2 cups all-purpose flour
- 1 1/2 tsp baking powder
- 1/2 tsp salt
- 1/8 tsp black pepper
- 1/4 tsp garlic powder
- 1/8 tsp cayenne pepper (optional)
- 6 Tbsp butter (I used salted)
- 2 oz finely shredded Parmesan cheese
- 1/2 cup milk
- 1/4 cup heavy cream
Directions
- Preheat oven to 450 degrees. In a mixing bowl whisk together flour, baking powder, salt, pepper, garlic powder and cayenne pepper for 30 seconds. Stir in parmesan cheese. Add butter, and using your fingertips, rub butter into mixture until evenly distributed it comes together like the size of peas. Pour in milk and heavy cream and stir with a wooden spoon just until combined (batter should be lumpy and sticky). Drop about a scant 1/4 cup of batter at a time onto a parchment paper lined baking sheet. Bake in preheated oven until golden, about 10 minutes. Remove from oven and cool on wire rack.
Wednesday, July 29, 2015
3 Fabulous Crock Pot Meals!
I'm linking up with the fabulous Dweej today! I'm sharing not one but three, that's right three, fabulous crock pot dinners. They are easy and we love each one of them!
Mississippi Roast
Ingredients:
1 chuck roast (4-5lbs)
1 packet ranch dressing/dip mix
1 packet McCormick's Gravy Mix (au jus)
1 stick butter
5-10 pepperoncini peppers
Directions:
Mix the ranch packet and the gravy pack together. Sprinkle on chuck roast.
Put a stick of butter on top of the roast. Place peppers on top.
Cook in slow cooker on low 4-6 hours until done.
And when I made it last night, I didn't even mix the spice packs. I just sprinkled them separately. And you read it correctly - there is no liquid in this other than the better when it melts.
Meat cooked in butter? What's not to love?
It doesn't look like much in the crock pot before it cooks.
Or even when it's done cooking. But it is yummy!
And because my husband loves him some beef, here's another pot roast recipe:
3 Packet Pot Roast
Ingredients:
1 cup water
1 (.7 ounce) packet dry Italian-style salad dressing mix
1 (1 ounce) packet ranch dressing mix
1 (.75 ounce) packet dry brown gravy
1 (3 pound) boneless chuck roast
Directions:
Whisk together water and contents of all packets until smooth. Place beef roast into crock pot and pour the sauce over the top. Cook on low for about 6 hours.
And because man can't live on beef alone, here's a yummy one pot chicken meal:
Crock Pot Italian Chicken and Potatoes
Ingredients:
4 boneless chicken breasts
1 cup Italian salad dressing
2 teaspoons of Italian seasoning
1 cup of grated Parmesan cheese
potatoes, peeled and cut into chunks
carrots, peeled and cut into chunks
Directions:
Place chicken in crock pot. Sprinkle with half the Italian dressing, spices and cheese. Place carrots and potatoes around the chicken and cover with remaining dressing, spices and cheese. Cook on low for about 6 hours.
Mississippi Roast
Ingredients:
1 chuck roast (4-5lbs)
1 packet ranch dressing/dip mix
1 packet McCormick's Gravy Mix (au jus)
1 stick butter
5-10 pepperoncini peppers
Directions:
Mix the ranch packet and the gravy pack together. Sprinkle on chuck roast.
Put a stick of butter on top of the roast. Place peppers on top.
Cook in slow cooker on low 4-6 hours until done.
And when I made it last night, I didn't even mix the spice packs. I just sprinkled them separately. And you read it correctly - there is no liquid in this other than the better when it melts.
Meat cooked in butter? What's not to love?
It doesn't look like much in the crock pot before it cooks.
Or even when it's done cooking. But it is yummy!
3 Packet Pot Roast
Ingredients:
1 cup water
1 (.7 ounce) packet dry Italian-style salad dressing mix
1 (1 ounce) packet ranch dressing mix
1 (.75 ounce) packet dry brown gravy
1 (3 pound) boneless chuck roast
Directions:
Whisk together water and contents of all packets until smooth. Place beef roast into crock pot and pour the sauce over the top. Cook on low for about 6 hours.
And because man can't live on beef alone, here's a yummy one pot chicken meal:
Crock Pot Italian Chicken and Potatoes
Ingredients:
4 boneless chicken breasts
1 cup Italian salad dressing
2 teaspoons of Italian seasoning
1 cup of grated Parmesan cheese
potatoes, peeled and cut into chunks
carrots, peeled and cut into chunks
Directions:
Place chicken in crock pot. Sprinkle with half the Italian dressing, spices and cheese. Place carrots and potatoes around the chicken and cover with remaining dressing, spices and cheese. Cook on low for about 6 hours.
Friday, July 17, 2015
Lemon Feta Dip!
I found a great recipe on Pinterest on Wednesday and have already made it twice! Well, to be fair, I only made half a batch on Wednesday but went to the store and got more feta and made a full batch yesterday.
It's so yum and so simple that I feel the need to share it with you!
If you're like me and love you some feta - then you're gonna love this dip.
The recipe is from Sweet Paul and was originally in his cookbook, Sweet Paul Make and Eat.
We have a ton of cucumbers from the garden and I have been using those in this dip. A great way to use up my cucumbers and its a very low carb snack!
I hope you enjoy!
It's so yum and so simple that I feel the need to share it with you!
If you're like me and love you some feta - then you're gonna love this dip.
The recipe is from Sweet Paul and was originally in his cookbook, Sweet Paul Make and Eat.
Sweet Paul's Lemon and Feta Dip
7 ounces feta cheese (about 1 cup crumbled)
1 tablespoon grated lemon zest, plus more for garnish
1–2 tablespoons fresh lemon juice
1 garlic clove, minced
6 tablespoons extra-virgin olive oil, plus more for serving
Pinch of red pepper flakes
CruditƩs, chips, toasts, or pita crisps, for serving
- Place the feta, lemon zest, 1 tablespoon lemon juice, garlic, and olive oil in a blender and whir until combined but still slightly chunky. It’s dense, so you may need to stir it with a fork once or twice. Taste, and if it’s too salty add more lemon juice.
- Spoon into a serving bowl, drizzle with a little oil, and sprinkle with a pinch of pepper flakes and some lemon zest.
- Serve with cruditƩs, chips, toasts or pita crisps.
We have a ton of cucumbers from the garden and I have been using those in this dip. A great way to use up my cucumbers and its a very low carb snack!
I hope you enjoy!
Wednesday, July 8, 2015
When life gives you blueberries, make blueberry pie!
We have a few blueberry bushes and they have lots of blueberries on them. I picked quite a few last week and Sarah asked if she could make a pie. My recipe is super easy and super tasty so I let her go for it!
I've shared the recipe before (but it was back in 2009 and please look at my babies!) so here it is again. It's so good, it bears repeating!
Delicious Creamy Blueberry Pie
If you've got blueberries and are craving a pie, make this one! You won't regret it!
I've shared the recipe before (but it was back in 2009 and please look at my babies!) so here it is again. It's so good, it bears repeating!
Delicious Creamy Blueberry Pie
INGREDIENTS
- 3 cups fresh blueberries
- 1 (9 inch) deep dish pie crust
- 1 cup white sugar
- 1/3 cup all-purpose flour
- 1/8 teaspoon salt
- 2 eggs, beaten
- 1/2 cup sour cream
- 1teaspoon vanilla
- 1/4 teaspoon lemon juice
- 1/4 cup white sugar
- 1/4 cup brown sugar
- 1/2 cup all-purpose flour
- 1/4 cup butter
DIRECTIONS
- Combine 1 cup sugar, 1/3 cup flour, and salt. Add eggs, sour cream, vanilla and lemon juice, stirring until blended.
- Place blueberries in pastry shell, and spoon sour cream mixture over berries.
- In another bowl, combine 1/4 cup white sugar, 1/4 cup brown sugar and 1/2 cup flour. Cut in butter until mixture resembles course meal. Sprinkle this mixture over sour cream mixture and berries in the pie shell.
- Bake at 350 degrees F (175 degrees C) for 60 minutes, or until lightly browned and not shaking in the center.
If you've got blueberries and are craving a pie, make this one! You won't regret it!
Tuesday, May 19, 2015
Easy and Delicious Cookout Menu
It's rare that I hit one out of the park when I cook a meal so when I do, I have to share it with you guys!Saturday was a beautiful spring day and we were planning to use the grill and eat outside. I normally opt for burgers but that gets old after a while, so I tried something new.
We went with the following menu and it was so delish that I will be repeating it on Memorial Day weekend when we have friends over.
Easy and Delicious Cookout Menu:
Grilled Chicken Kabobs
Mexican Street Corn
Grilled Avocados
The only thing I plan to add when we have friends over is a big dish of baked beans. (I use my mom's recipe for those and they are so good!)
The recipe I used for the kabobs can be found here. However, I modified the recipe and this is my version:
Grilled Chicken Kabobs
Ingredients
- 2 pounds boneless, skinless chicken breasts
- 2 teaspoons salt
- 3 teaspoons paprika
- 2 tablespoons brown sugar
- 2-3 slices raw bacon, cut into 1/2-inch pieces
- 1 cup of Sweet Baby Ray's BBQ Sauce
Directions
- Trim excess fat from chicken and cut the chicken into 1-inch cubes. In a large bowl, toss the chicken with the salt. Then cover with plastic wrap and refrigerate for at least 30 minutes and up to 1 hour.
- Turn all grill burners to high, close lid, and heat for about 15 minutes.Turn all burners off except for the main burner.
- Combine paprika and sugar. Place the raw bacon in a food processor and pulse for about 45 seconds, until a smooth paste forms, scraping down the sides of the bowl a couple of times.Add the bacon paste and spice mixture to the chicken. Mix with hands or spatula until the ingredients are blended and chicken is coated. It's a little gloppy and hard to coat, but don't worry it will still taste great even if you can't get it all covered.
- Thread the chicken onto the skewers.Spray cooking spray on grill.
- Grill the chicken over the main burner with lid closed, turning one-quarter of a turn every 2 minutes.
- Brush the top of kebabs with BBQ sauce; flip and cook until sauce is browned,about 1 minute. Brush second side with sauce; flip and cook for another minute or so, until cooked through.
- Remove kebabs from grill and let rest for 5 minutes. Serve with remaining BBQ sauce separately, if desired.
Mexican Street Corn
Ingredients
- 5 ears fresh corn, husked
- 1/4 cup mayonnaise
- 2 Tablespoons sour cream
- 1/4 teaspoon garlic salt
- Juice from one lime
- 1/4 cup grated Cotija cheese or grated Queso Fresco
- 1 teaspoon smoked paprika (or chili powder if you want heat)
- Chopped cilantro, for garnish (optional)
Directions
- Cook corn in boiling water for about 20 minutes or until tender.
- Mix mayo, sour cream, garlic salt and lime juice in a small bowl.
- Mix cheese and paprika in another small bowl.
- As soon as the corn is cooked, spread mayo mixture all over corn and then sprinkle with the cheese mixture.
- Garnish with cilantro if desired.
- Serve immediately.
And finally, grilled avocados! I saw this recipe somewhere on Pinterest but didn't pin it. It's super easy though so here it is from memory:
Grilled Avocados
- 3 avocados, halved with pit removed
- lime juice
- olive oil
- salt
- salsa or pico de gallo
- Brush each avocado half with lemon juice and olive oil.
- Sprinkle with salt
- Put flesh side down on the grill and cook for about 5 minutes or so. You want it cooked through with grill marks but you don't want it too mushy.
- Place a big spoonful of your favorite salsa right in the center of the avocado
And with that, go forth and have an easy and delicious cookout this weekend!
Tuesday, August 12, 2014
If you give a bored stay at home mom a giant basil bush...
The other day I posted this picture of our two basil plants on Instagram.
I would love to take credit for these two beauties but the garden is my husband's domain. Occasionally I will water and pick things but only if he's out of town.
I had been eating a lot of this in an attempt to use up our tomatoes and this gorgeous basil...
...but while very yummy, this was going to leave a lot of beautiful basil wasting away on the bush.
Several people told me that I should make pesto, and low and behold, guess what the Pioneer Woman posted today?
A PESTO RECIPE!
And guess who had free time today and all the ingredients?
That's right! Me!
So I set out to make a batch of homemade pesto. And in honor of Ree, I took pictures to document the process.
I collected a load of basil and trimmed the stalk ends. It filled up my colander to give you an idea of the amount of leaves I used. Probably about 5 cups.
Then I tossed it into my food processor and pulsed it a bit until the leaves were broken down. And then I added two cloves of garlic that I grated on my micro plane just like PW did. She said this allows you to have the garlic flavor but keeps you from getting big chunks of raw garlic in your mouth. Good tip! I also added 3/4 cup of Parmesan cheese and several large pinches of kosher salt.
She only added 1/2 cup of cheese but she also used almonds. (Most pesto has pine nuts or almonds or pecans but since Peter is allergic to all nuts, I omitted them and added extra cheese. If I had had more parm, I might have even gone up to a cup but I used all I had).
Then I pulsed away until it was all combined and then I started to add olive oil. I did as PW instructed and started processing the basil while slowly drizzling in a 1/2 cup of olive oil. After it was combined, it looked like this....
It was still a little chunk so I continued to add another 1/4 cup of olive oil until it looked like this....
Perfect!
PW added another 1/2 cup but I've got a feeling it's because of the almonds. Since I didn't have any nuts, I didn't need the extra oil. You'll just need to process and add oil and check for consistency. It's better to have to keep adding that to get too much in there.
This stuff tasted so good!
And then, because I was hungry from all my hard work (ha!), I had a nice little snack...
I can not even begin to tell you how good this tasted with fresh pesto. It was wonderful!
And now I'm heading to the store to get more EVOO and more Parmesan cheese and some freezer containers so I can make mass quantities of this stuff!
Ingredients:
5 cups of basil leaves, rinsed with the steam trimmed
2 cloves garlic, grated with a microplane
3/4 cup of Parmesan cheese, grated (not the kind in the green container)
3/4 cup of olive oil
kosher salt, several pinches
Directions:
Place basil in food processer and process until leaves are chopped.
Add garlic, cheese and salt and process until combined.
Slowly drizzle 1/2 cup of olive oil while processing.
Check consistency of pesto. If it's too thick continue to slowly add more olive oil until it's nice and smooth.
Enjoy!
I would love to take credit for these two beauties but the garden is my husband's domain. Occasionally I will water and pick things but only if he's out of town.
I had been eating a lot of this in an attempt to use up our tomatoes and this gorgeous basil...
...but while very yummy, this was going to leave a lot of beautiful basil wasting away on the bush.
Several people told me that I should make pesto, and low and behold, guess what the Pioneer Woman posted today?
A PESTO RECIPE!
And guess who had free time today and all the ingredients?
That's right! Me!
So I set out to make a batch of homemade pesto. And in honor of Ree, I took pictures to document the process.
I collected a load of basil and trimmed the stalk ends. It filled up my colander to give you an idea of the amount of leaves I used. Probably about 5 cups.
Then I tossed it into my food processor and pulsed it a bit until the leaves were broken down. And then I added two cloves of garlic that I grated on my micro plane just like PW did. She said this allows you to have the garlic flavor but keeps you from getting big chunks of raw garlic in your mouth. Good tip! I also added 3/4 cup of Parmesan cheese and several large pinches of kosher salt.
She only added 1/2 cup of cheese but she also used almonds. (Most pesto has pine nuts or almonds or pecans but since Peter is allergic to all nuts, I omitted them and added extra cheese. If I had had more parm, I might have even gone up to a cup but I used all I had).
Then I pulsed away until it was all combined and then I started to add olive oil. I did as PW instructed and started processing the basil while slowly drizzling in a 1/2 cup of olive oil. After it was combined, it looked like this....
Perfect!
PW added another 1/2 cup but I've got a feeling it's because of the almonds. Since I didn't have any nuts, I didn't need the extra oil. You'll just need to process and add oil and check for consistency. It's better to have to keep adding that to get too much in there.
This stuff tasted so good!
And then, because I was hungry from all my hard work (ha!), I had a nice little snack...
I can not even begin to tell you how good this tasted with fresh pesto. It was wonderful!
And now I'm heading to the store to get more EVOO and more Parmesan cheese and some freezer containers so I can make mass quantities of this stuff!
Beth's Nut Free Pesto
Ingredients:
5 cups of basil leaves, rinsed with the steam trimmed
2 cloves garlic, grated with a microplane
3/4 cup of Parmesan cheese, grated (not the kind in the green container)
3/4 cup of olive oil
kosher salt, several pinches
Directions:
Place basil in food processer and process until leaves are chopped.
Add garlic, cheese and salt and process until combined.
Slowly drizzle 1/2 cup of olive oil while processing.
Check consistency of pesto. If it's too thick continue to slowly add more olive oil until it's nice and smooth.
Enjoy!
Tuesday, June 10, 2014
Avocado Hummus
I found a great recipe for Avocado Hummus on Pinterest and I made it yesterday. And if I must say, it was delicious!
Here's the original recipe.
Here's my version. I modified the original because I don't typically have tahini hanging out in the old cupboard. So I upped the lime juice, garlic, and cumin to give it extra flavor.
Ingredients
- 1 (15 oz) can chick peas, well drained
- 2 medium ripe avocados, cored and peeled
- 3 Tbsp olive oil, plus more for serving if desired
- 6 Tbsp fresh lime juice
- 2 clove garlic, peeled
- Salt and freshly ground black pepper to taste
- 2 tsp cumin
- 1 - 2 Tbsp finely chopped cilantro leaves, for topping
- Red pepper flakes, for topping
Place the first seven ingredients into the food processor and blend for about 2 minutes until smooth.
Garnish with cilantro and red pepper flakes if you want to make it fancy. (When Sarah saw the completed dish she exclaimed, "Mom, it's so pretty! And so fancy!")
I ate half the bowl with sugar snap peas. Don't judge. It was my lunch!
Thursday, February 16, 2012
Andes Mint Cookies
I tried a new cookie recipe that I found on Pinterest. The original recipe was found at Six Sisters' Stuff.
I love chocolate and I love Andes Mints and the recipe only has four ingredients so I figured I would make them as a Valentine's treat for our family.
Andes Mint Cookies
Ingredients
1 Devil's Food Cake Mix
1/2 cup oil
2 eggs
1 package of Andes Mints
Directions
Mix cake mix, oil, and eggs together.
Drop spoonfuls of dough onto baking sheet. (I used my Pampered Chef scoop and it worked perfectly for this consistency of dough.)
Bake at 350 degrees for 6-9 minutes. Be careful not to overback them.
Take sheet out of oven and while the cookies are still very hot, place an Andes Mint on top of each cookie.
Wait 5 minutes until the mint has melted. Take a spoon and smooth out each mint like frosting.
My batch made 22 cookies.
The verdict from out family:
My father-in-law and son loved them.
Sarah and I did not care for them at all. I guess we just like our mints and our cookies separate.
My husband does not like mints and wouldn't even try them.
These are super easy to make and with only four ingredients, you should give them a shot! Someone in your house will thank you!
I love chocolate and I love Andes Mints and the recipe only has four ingredients so I figured I would make them as a Valentine's treat for our family.
Andes Mint Cookies
Ingredients
1 Devil's Food Cake Mix
1/2 cup oil
2 eggs
1 package of Andes Mints
Directions
Mix cake mix, oil, and eggs together.
Drop spoonfuls of dough onto baking sheet. (I used my Pampered Chef scoop and it worked perfectly for this consistency of dough.)
Bake at 350 degrees for 6-9 minutes. Be careful not to overback them.
Take sheet out of oven and while the cookies are still very hot, place an Andes Mint on top of each cookie.
Wait 5 minutes until the mint has melted. Take a spoon and smooth out each mint like frosting.
My batch made 22 cookies.
The verdict from out family:
My father-in-law and son loved them.
Sarah and I did not care for them at all. I guess we just like our mints and our cookies separate.
My husband does not like mints and wouldn't even try them.
These are super easy to make and with only four ingredients, you should give them a shot! Someone in your house will thank you!
Tuesday, January 24, 2012
Pioneer Woman's Brussels Sprouts with Balsamic and Cranberries - A Review
I recently made a recipe from the Pioneer Woman and wanted to give an honest review from a cook that has a lot to learn but still wants to make good food. Sometimes I even want to make fancy food so that's what prompted me to try Pioneer Woman's Brussels Sprouts with Balsamic and Cranberries. I'm sure Ree would say that these aren't fancy but around this house, any vegetable that didn't come from the freezer is considered fancy.
I've made it twice now and here's what I've learned.
The first time I made it, I did not have the cranberries so I just left those out. Instead, I added bacon because I was afraid the sprouts were going to be a little too sweet.
I think the bacon added a nice bit of saltiness and helped me to coax my meat loving people that they should eat some of the little cabbage looking things I had placed lovingly on their plates. Telling them that there was a sugary glaze coating them also made it easier to try.
I should mention here that I goofed on the balsamic sugar reduction. I let it cook too long and by them time I got the reduction on the Brussels sprouts, it was starting to harden. Half the Brussels spouts had a hard candied glaze on them making them hard to chew. The glaze on the other half had not hardened and was delicious.
Even with my goof on the glaze, I thought these were really, really good. My father-in-law had several helpings and my husband even managed to get down a serving and commented "not bad". (My husband is a meat and potatoes and don't expect me to eat a lot of green things kind of guy.) The kids barely managed to get down one Brussels sprout. But they did try them.
I thought they were great and couldn't wait to make them again. The next time I made them though, I was going to use the cranberries just like PW calls for AND I was going to get the reduction right this time.
I made them on Saturday night. I still added the bacon and I added the cranberries.
But, once again, I had trouble with the reduction. This time I didn't let it cook long enough and it didn't thicken up. And because it didn't cook long enough, the balsamic flavor overpowered the Brussels sprouts (Does anyone else find it annoying that it's Brussels and not Brussel? It's driving me crazy while typing this post.) and was too tangy. And the cranberries? They didn't add a thing!
I will make these again even though my husband and kids won't be thrilled. Next time I make them, I will add the bacon, leave out the cranberries and make sure that I get the glaze done properly. I have the hardest time getting all of the dinner components on the table at the same time without something being undercooked, overcooked, or just plain cold.
Aren't they pretty?
Check out PW's site for really pretty pictures and step-by-step instructions.
Pioneer Woman's Brussels Sprouts with Cranberries and Balsamic Glaze.
Pin It
I've made it twice now and here's what I've learned.
The first time I made it, I did not have the cranberries so I just left those out. Instead, I added bacon because I was afraid the sprouts were going to be a little too sweet.
I think the bacon added a nice bit of saltiness and helped me to coax my meat loving people that they should eat some of the little cabbage looking things I had placed lovingly on their plates. Telling them that there was a sugary glaze coating them also made it easier to try.
I should mention here that I goofed on the balsamic sugar reduction. I let it cook too long and by them time I got the reduction on the Brussels sprouts, it was starting to harden. Half the Brussels spouts had a hard candied glaze on them making them hard to chew. The glaze on the other half had not hardened and was delicious.
Even with my goof on the glaze, I thought these were really, really good. My father-in-law had several helpings and my husband even managed to get down a serving and commented "not bad". (My husband is a meat and potatoes and don't expect me to eat a lot of green things kind of guy.) The kids barely managed to get down one Brussels sprout. But they did try them.
I thought they were great and couldn't wait to make them again. The next time I made them though, I was going to use the cranberries just like PW calls for AND I was going to get the reduction right this time.
I made them on Saturday night. I still added the bacon and I added the cranberries.
But, once again, I had trouble with the reduction. This time I didn't let it cook long enough and it didn't thicken up. And because it didn't cook long enough, the balsamic flavor overpowered the Brussels sprouts (Does anyone else find it annoying that it's Brussels and not Brussel? It's driving me crazy while typing this post.) and was too tangy. And the cranberries? They didn't add a thing!
I will make these again even though my husband and kids won't be thrilled. Next time I make them, I will add the bacon, leave out the cranberries and make sure that I get the glaze done properly. I have the hardest time getting all of the dinner components on the table at the same time without something being undercooked, overcooked, or just plain cold.
Aren't they pretty?
Check out PW's site for really pretty pictures and step-by-step instructions.
Pioneer Woman's Brussels Sprouts with Cranberries and Balsamic Glaze.
Ingredients
- 3 pounds Brussels Sprouts
- 1/2 cup Olive Oil
- Salt And Pepper
- 1 cup Balsamic Vinegar
- 1/2 cup Sugar
- 1 cup Dried Cranberries
Preparation Instructions
Trim/clean Brussels sprouts, then cut them in half if desired (or you can leave them whole). Arrange on two baking sheets and toss with olive oil. Sprinkle with plenty of salt and pepper and roast at 375 degrees for 25 to 30 minutes, or until brown.
Combine balsamic vinegar and sugar in a saucepan. Bring to a boil, then reduce heat to medium-low and reduce until very thick, about 15 to 20 minutes.
Drizzle the balsamic reduction over the roasted sprouts, then sprinkle on dried cranberries. Toss and serve immediately.
Combine balsamic vinegar and sugar in a saucepan. Bring to a boil, then reduce heat to medium-low and reduce until very thick, about 15 to 20 minutes.
Drizzle the balsamic reduction over the roasted sprouts, then sprinkle on dried cranberries. Toss and serve immediately.
Pin It
Tuesday, December 20, 2011
Reindeer Nose Treats Recipe
I am helping out with Sarah's party today and have to bring in a sweet treat. Another mom is in charge of the major sweet for the party (I am assuming cupcakes or cookies) so I thought I would make these.
I love the combination of sweet and salty and I really love that they are so simple that even I can do it without messing them up!
Reindeer Nose Treats
Ingredients:
1 bag small, waffle-shaped pretzels
1 bag Hershey's Kisses or Hugs
1 bag red and green M&M candies
Directions:
I love the combination of sweet and salty and I really love that they are so simple that even I can do it without messing them up!
Reindeer Nose Treats
Ingredients:
Directions:
Preheat your oven to 170 degrees.
Put a piece of wax paper on a cookie sheet.
Place pretzels on the wax paper.
Unwrap Hershey's Kisses.
Place one Hershey's Kiss on top of each pretzel.
Bake for 4-6 minutes depending on your oven. (It took 6 minutes in mine.)
Remove from oven and press one M&M into the top of the Hershey's Kiss.
Allow to cool completely. (I stuck mine in the fridge to speed this step up.)
(Please note - if you can find the round pretzels, use those. The finished product will look more like a reindeer's nose. However, either shape will taste just as good!)
Ready for the oven!
Topped with M&Ms!
Aren't they pretty?
Ready for the oven!
Topped with M&Ms!
Aren't they pretty?
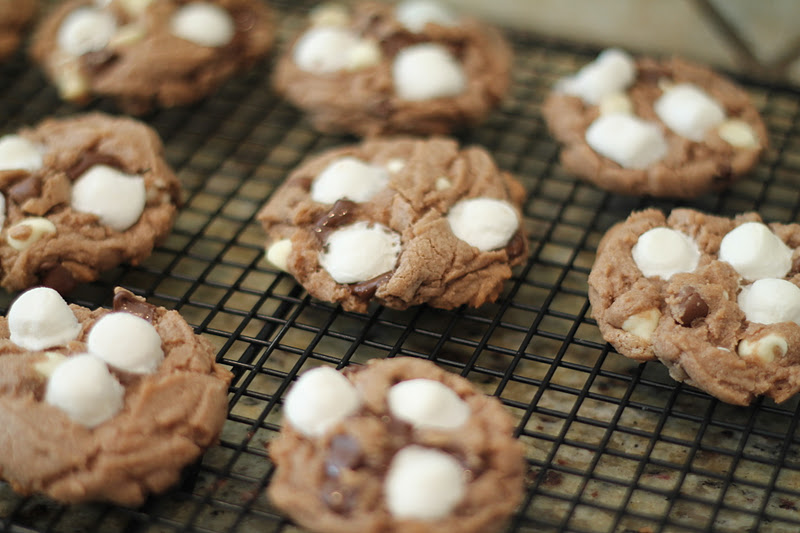
Thursday, December 8, 2011
Hot Chocolate Cookies
The kids helped me bake cookies today as part of a project for school. The cookies will be sent to a local Hospice House for the patients and their families.
I wanted to try something different than a regular chocolate chip cookie. Although in my opinion, you can't go wrong with a regular chocolate chip cookie. I was just afraid the Hospice House might get lots of regular chocolate chip cookies and the recipients might appreciate something with a little twist!
I found a recipe for Hot Chocolate Cookies on Recipe Shoebox. Check out her blog - there are so many great recipes on it for the holidays. She even made homemade marshmallows!
These cookies were easy to make which was nice since I had two little helpers. They weren't messy to make and they came together pretty quickly - which was nice since I had two little helpers!
Best of all - they were delicious. (And why wouldn't they be? They are made with three kinds of chocolate chips, hot chocolate mix and marshmallows!)
Here's the recipe:
The ingredients:
1 cup softened butter
1 cup sugar
⅔ cup brown sugar
2 large eggs
1 tsp. vanilla
3-¼ cups all-purpose flour
4 packets hot chocolate mix
1 tsp. salt
1-¼ tsp. baking soda
1 cup white chocolate chips
1 cup milk chocolate chips (I only had semi-sweet chips in the house, so I just added another cup in place of the milk chocolate chips)
1 cup semi-sweet chocolate chips
1 cup mini marshmallows
Directions: Cream butter and sugars until smooth. Beat in eggs and vanilla until combined. In a separate bowl, combine flour, hot chocolate mix, salt and baking soda. Add to wet ingredients until well combined. NOTE: Mixture will be thick. Fold in chips.
Scoop dough onto baking sheets lined with parchment paper.
**READ THESE DIRECTIONS CAREFULLY BEFOREHAND**
Bake at 350 degrees for about 7 minutes, remove pan from oven, then working quickly press 3-4 mini marshmallows into the top of each cookie...pressing them down into the partially baked dough so the cookie will flatten slightly and the marshmallows will not fall out. Replace cookies in oven and bake an additional 2-3 minutes, or until edges and marshmallows are light golden brown. Let cool for 5 minutes before removing from pan.
Enjoy!
I wanted to try something different than a regular chocolate chip cookie. Although in my opinion, you can't go wrong with a regular chocolate chip cookie. I was just afraid the Hospice House might get lots of regular chocolate chip cookies and the recipients might appreciate something with a little twist!
I found a recipe for Hot Chocolate Cookies on Recipe Shoebox. Check out her blog - there are so many great recipes on it for the holidays. She even made homemade marshmallows!
These cookies were easy to make which was nice since I had two little helpers. They weren't messy to make and they came together pretty quickly - which was nice since I had two little helpers!
Best of all - they were delicious. (And why wouldn't they be? They are made with three kinds of chocolate chips, hot chocolate mix and marshmallows!)
Here's the recipe:
Hot Chocolate Cookies
From the Recipe Shoebox.The ingredients:
1 cup softened butter
1 cup sugar
⅔ cup brown sugar
2 large eggs
1 tsp. vanilla
3-¼ cups all-purpose flour
4 packets hot chocolate mix
1 tsp. salt
1-¼ tsp. baking soda
1 cup white chocolate chips
1 cup milk chocolate chips (I only had semi-sweet chips in the house, so I just added another cup in place of the milk chocolate chips)
1 cup semi-sweet chocolate chips
1 cup mini marshmallows
Directions: Cream butter and sugars until smooth. Beat in eggs and vanilla until combined. In a separate bowl, combine flour, hot chocolate mix, salt and baking soda. Add to wet ingredients until well combined. NOTE: Mixture will be thick. Fold in chips.
Scoop dough onto baking sheets lined with parchment paper.
**READ THESE DIRECTIONS CAREFULLY BEFOREHAND**
Bake at 350 degrees for about 7 minutes, remove pan from oven, then working quickly press 3-4 mini marshmallows into the top of each cookie...pressing them down into the partially baked dough so the cookie will flatten slightly and the marshmallows will not fall out. Replace cookies in oven and bake an additional 2-3 minutes, or until edges and marshmallows are light golden brown. Let cool for 5 minutes before removing from pan.
Enjoy!
Tuesday, November 8, 2011
Beth's Award-Winning Chili Recipe!
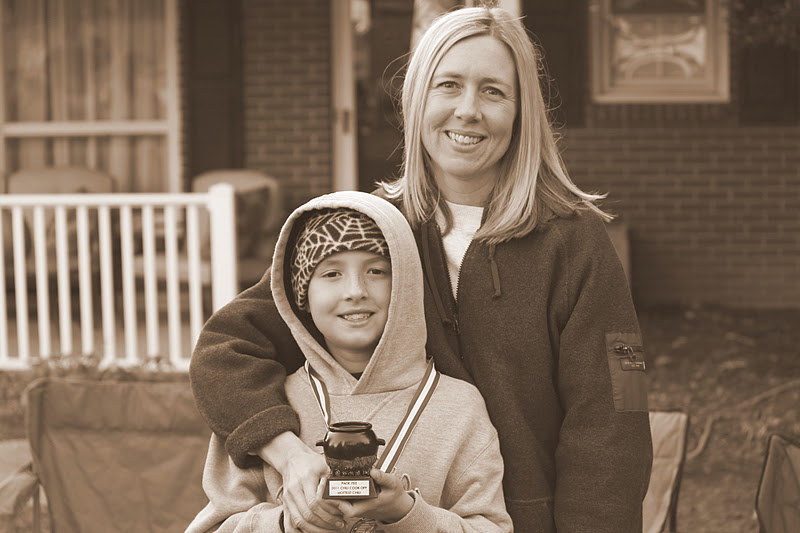
I mentioned previously that although Peter's boat didn't win anything in the Cub Scout Rain Gutter Regatta, our chili won for Hottest Chili!
And I say "our" because he did help me. He dumped everything in the pot and really, after sauteing the beef, what else is there to do?
There were at least 15 pots of chili at the Regatta and even though I knew my chili was good, I didn't think it was good enough to win an award.
There were 5 judges who tasted everything, voted, compared notes and at one point could even be heard disagreeing. (Well, maybe disagreeing isn't the right word. Dan came up to me after checking out the chili and said, "the judges are having a hard time agreeing on who's the winner". That could be considered disagreeing, right?)
I used my regular chili recipe which I think tastes very similar to the chili that Wendy's restaurants serve and I add about 4 tablespoons of jalapenos.
The jalapenos that I used were from our garden. I had sliced all the jalapenos, put them in a pot, covered them with vinegar and let them simmer until they had softened. I have on old pickle jar which I store them in.
Here's my recipe. I didn't think it was super hot but Dan thought it was pretty spicy. And apparently so did some of the judges. I kept saying to Dan, "It's really not that hot! Wonder why I won this?" Dan said it's because the award is really supposed to be for "Hottest Chili Maker!" I love that man!
Beth's Award-Winning Chili
Ingredients
Directions
For more slow cooker recipes visit Diary of a Stay at Home Mom.
And I say "our" because he did help me. He dumped everything in the pot and really, after sauteing the beef, what else is there to do?
There were at least 15 pots of chili at the Regatta and even though I knew my chili was good, I didn't think it was good enough to win an award.
There were 5 judges who tasted everything, voted, compared notes and at one point could even be heard disagreeing. (Well, maybe disagreeing isn't the right word. Dan came up to me after checking out the chili and said, "the judges are having a hard time agreeing on who's the winner". That could be considered disagreeing, right?)
I used my regular chili recipe which I think tastes very similar to the chili that Wendy's restaurants serve and I add about 4 tablespoons of jalapenos.
The jalapenos that I used were from our garden. I had sliced all the jalapenos, put them in a pot, covered them with vinegar and let them simmer until they had softened. I have on old pickle jar which I store them in.
Here's my recipe. I didn't think it was super hot but Dan thought it was pretty spicy. And apparently so did some of the judges. I kept saying to Dan, "It's really not that hot! Wonder why I won this?" Dan said it's because the award is really supposed to be for "Hottest Chili Maker!" I love that man!
Beth's Award-Winning Chili
Ingredients
- 2 pounds ground beef
- 1 medium onion, diced
- 1 green pepper, diced
- 1 (1.25 ounce) package chili seasoning mix
- 2 cups water
- 1 (6 ounce) can tomato paste
- 1 (16 ounce) can chili beans, undrained
- 1 (16 ounce) can baked beans
- 1 (10.75 ounce) can tomato soup
- 1 (10 ounce) can diced tomatoes with green chile peppers
- 4 tablespoons diced jalapenos (pickled not raw)
- In a dutch oven over medium heat, cook beef, onion and green pepper until beef is brown. Add chili seasoning and water. Stir well.
- Add the rest of the ingredients, stir and cook on low for 2 hours stirring occasionally. (This recipe also works well in a crock pot.)
- Serve with jalapenos, shredded cheddar cheese and sour cream.
![]() |
| Here we are with our trophy! |
| Doesn't this look delicious? |
| Isn't this trophy adorable? |
For more slow cooker recipes visit Diary of a Stay at Home Mom.
Subscribe to:
Posts (Atom)